
こんにちは、むたこなです。
今回の記事では、MenuItemに登録されている処理を実行できるEditorApplication.ExecuteMenuItemというメソッドを使ってUnityが純正で持っているMenuItemを拡張して独自のMenuItemを作ってみます。
あんまり使い道ないかもしれませんが、誰かのお役に立てれば幸いです。
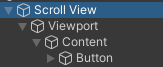
ScrollViewのcontentにButtonを配置した状態で生成
ScrollViewにButtonを配置した状態で作成するスクリプトです。
using UnityEngine;
using UnityEngine.UI;
using UnityEditor;
public class SampleCalss : MonoBehaviour
{
[MenuItem("GameObject/UI/Customs/" + nameof(SampleCalss))]
public static void CreateCustomScrollView()
{
//ScrollViewの生成
EditorApplication.ExecuteMenuItem("GameObject/UI/Scroll View");
var scrollViewObj = Selection.activeGameObject;
var scrollRect = scrollViewObj.GetComponent<ScrollRect>();
var parent = scrollRect.content.transform;
//ScrollViewのcontentの下にButtonを生成
EditorApplication.ExecuteMenuItem("GameObject/UI/Button - TextMeshPro");
var buttonObj = Selection.activeGameObject;
buttonObj.transform.SetParent(parent);
//ScrollViewを選択した状態で終了
Selection.activeGameObject = scrollViewObj;
}
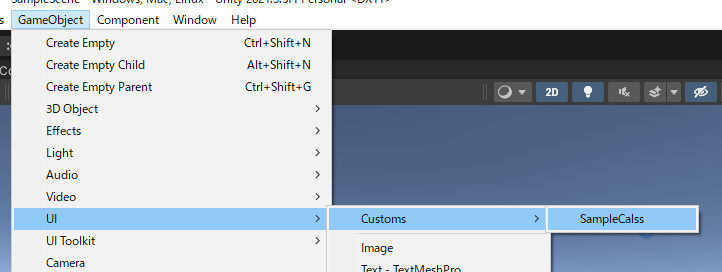
}上記のスクリプトを任意の場所に置けば、以下のようにItemMenuが増えていることが確認できます。
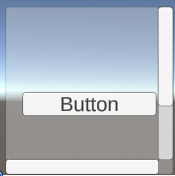
実行すると以下のようなScrollViewができます。
親子関係も想定通りになりました。
発展:さらにカスタムしたScrollViewを作る
上記のものをさらに発展させて、縦方向にスクロールするのに特化したものです。
using UnityEngine;
using UnityEngine.UI;
using UnityEditor;

public class SampleCalss : MonoBehaviour
{

    [MenuItem("GameObject/UI/Customs/" + nameof(SampleCalss))]
    public static void CreateCustomScrollView()
    {
        //ScrollViewの生成
        EditorApplication.ExecuteMenuItem("GameObject/UI/Scroll View");
        var scrollViewObj = Selection.activeGameObject;
        var scrollRect = scrollViewObj.GetComponent<ScrollRect>();
        var parent = scrollRect.content.transform;

        //ScrollRectのカスタム
        scrollRect.horizontal = false;
        DestroyImmediate(scrollRect.horizontalScrollbar.gameObject); //Destryだとエラー
        scrollRect.content.gameObject.AddComponent<VerticalLayoutGroup>();

        //ScrollViewのcontentの下にButtonを生成
        EditorApplication.ExecuteMenuItem("GameObject/UI/Button - TextMeshPro");
        var buttonObj = Selection.activeGameObject;
        buttonObj.transform.SetParent(parent);

        //ScrollViewを選択した状態で終了
        Selection.activeGameObject = scrollViewObj;
    }

}
追加した要素は以下です。
- ScrollRecth.horizontalをfalseに設定
- HorizonScrollBarをDestroyImmediate(Destroyだとエラーが出る)
- ScrollContentにVerticalLayoutGroupをアタッチ
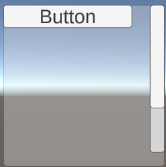
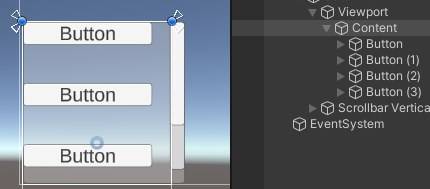
実行すると横方向のスクロールバーがなくなった状態で作成されます。
また、Contentを見るとVerticalLayoutGroupがアタッチされているので、
作成されたButtonを複製するだけできれいに項目を作ることができます。
まとめ
いかがだったでしょうか。
今回ご紹介した内容はかなり簡単な内容でしたが、
うまく利用できれば作業の短縮ができると思います。
UnityのUIでよく使うパターンがあれば、
積極的にEditorApplication.ExecuteMenuItemを使っていきましょう。


コメント